As a life long cyclist, I have learned that most cyclists take a lot of things for granted. If I had to explain how to balance on a bicycle, I would be completely lost. That being said – there are many smaller components of riding a bicycle that scare and even intimidate novice cyclists. As a YSC Tour de Pink cyclist, I’ve seen everything from very experienced cyclists to people who have ridden less than 40 miles before they start the 220 mile journey. Sometimes, a little knowledge goes a LONG way. In this article, I hope I can share some basics of shifting your average bicycle. As *MOST* people ride road bikes on a TdP, and *MOST* have Shimano components – I am going to speak to that. If you have SRAM or Campy, or ride a mountain bike – and have questions – feel free to ask questions!
Important note: There is a TON of info here, but realistically it all comes together with a little experience – read it slow, try it out, read it again, try it again! You do _NOT_ have to memorize ANY of this! Everything here could be taught in a 10 minute – in person – talk – it’s just challenging to convey in words!
The Basics:

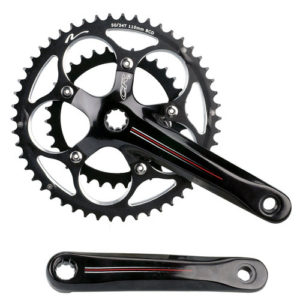
If you have a modern multi-geared bicycle you have 1, 2 or 3 chainrings in the front. These are the large toothy things attached to your crankset. The photo I included has 2 chainrings. Some bicycle will have a smaller one. We will call that the “granny ring”.
Which chainring you are in will dramatically affect how hard it is to pedal your bicycle. If you are in the large or big ring (the one with the most teeth), it will be MUCH harder than in the small ring. If you have three – the granny will be significantly easier.
All of the shifting in the FRONT of your bicycle is controlled by your LEFT shifter. (We will discuss this more in a minute). Your left shifter will move the chain from one ring to another – allowing you to go faster or be able to pedal up that big hill (or make it home when you are really tired. There is no shame in riding in the small ring, the big ring or any other gear on your bicycle. It’s all about riding the bike!
All things being the same (you didn’t change gears in the back) – shifting from your big chainring to your small chainring (shifting “down”) will make your bike much easier to pedal. Shifting “up” or to the big chainring will make your bicycle much harder to pedal.

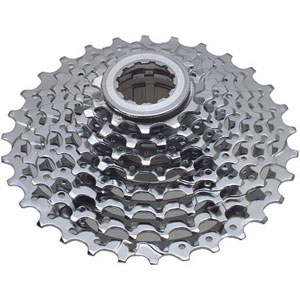
The next part of the bike we are going to talk about is the cassette. This is the rest of the gears of a bicycle. The cassette is mounted to the rear hub of the bicycle and much like different size chainring – will affect how easy or hard it is to pedal your bicycle. Which gear you are in – on your cassette – is controlled by your RIGHT shifter. Here is the “catch”. While a bigger chainring makes it harder to pedal, a SMALLER cog on your cassette makes it hard to pedal. This is VERY important to understanding how to shift a bicycle.
The cassette will have 5, 6, 7, 8, 9, 10 or 11 cogs. The smallest cog is the hardest gear on the cassette. The largest is the easiest. If you ignore (for a moment) which chainring you are in, shifting to a bigger cog will make it easier to pedal. Shifting to a smaller cog will make it harder to pedal.
Note: Some bikes have what is called “Optical Gear Display” or “OGD” which will give you and indication of what gear you are in. This can be helpful, but I find that a quick glance down or through your legs to see what gear is just as effective.
If you understand the basics I have set up here – you are ready to get shifting!
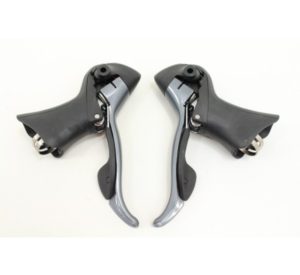
 In most modern road bikes, the shifting is integrated into your brake levers. As you can see in the photo here, there three basic parts of the lever. The “hoods” are the large black area at the top of the photo. This is a GREAT place to hold onto your bike. It offers you access to your brakes, your shifters and is just plain comfortable!
The next part is the large silver part. This is primarily your BRAKE lever, but it is also your shifter. On both the right and the left, pushing the large lever will shift you to something bigger (remember, bigger in the front and bigger in the back do the OPPOSITE things).
Finally, on the “back” of the brake/shift lever, there is a smaller lever. This is the “other shifter”. Pressing this small lever will move the chain to something smaller. It should be noted that the big lever can move 1 or more clicks allowing you to change MULTIPLE gears at once. The small lever must be pushed multiple times to shift multiple gears!
We’ve covered a LOT of material – so let’s summarize with a few rock solid basics before we go into “How do I shift my bike?”
- You have two shifters. Right controls the REAR derailleur (notice Right and Rear both start with R!). LEFT controls the FRONT derailleur.
- Pushing the BIG lever on either side will shift to something BIGGER.
- Pushing the LITTLE lever on either side will shift to something SMALLER.
- BIGGER on the FRONT makes it harder to pedal (but may be faster!)
- SMALLER on the REAR makes it easier to pedal (better for hills!)
With those 5 bullets, you know EVERYTHING you need to shift your bike!
Getting Started
If you have not ridden a multi-geared bike, I suggest you shift a few times, standing next to your bike. Push each lever. Get a feel for how they move. (Please – only 1-2 clicks on each, if you are not pedaling when shifting, you do stress your bike a bit.) We just want you to get a brief feel. The large shift lever moves a LOT more than the small – just see how it works.
The best way to get started is on a trainer, where you do not have to worry about traffic, curbs, kids and dogs! If you have a trainer, put your bike on there and start pedaling. If you don’t have one, that’s okay! You will want your bicycle in a “medium” gear. That is the small (or middle) chainring in the front and a “middle” gear in the rear. If you don’t have a trainer, ask a friend to hold your bike off the ground, pedal the bike with your hand and shift away!
Time to pedal and shift! Ride around a flat area (or spin on your trainer) and shift! I would suggest a “drill” where you try a few things, after each, pedal for 10-30 seconds to feel the difference. Here is a good starter drill:
- Using your right shifter – go “up” one (push large lever 1 click) (pedaling just got easier)
- Using your right shifter – go “down” one (push small lever 1 click)
- Using the right shifter – go “up” a few gears (push the large lever 2-3 clicks)
- Using the right shifter – go “down” a few gears (push the small lever multiple times)
- Using the right shifter – go “all the way up” (push the large lever multiple times until it wont move any more) – This is your easiest gear – in this chainring.
- Using the left shifter – go “all the way down” (push the small lever multiple times until it wont click any more) – This is your hardest gear – in this chainring.
Unless you live in a very hilly area – you probably have enough to ride for a long time, right now! Many people rarely shift in the front. I’ll talk about the front, now! You will want to be in a “middle” gear in the back to start this drill. Use what you learned above to sort that out!
- Using you left shifter – go to the big chainring (push the large lever). The bike should get a lot harder to pedal.
- Do some of the drill from above – note, everything is exactly the same – just harder to pedal!
- Using your left shifter – go to the small/middle chainring (push the small lever). The bike should get a lot easier to pedal.
- Do some of the drill from above – note, everything is exactly the same – just easier to pedal!
- If you have 3 chainrings …. continue on!
- Using your left shifter – go to the small chainring (push the small lever). The bike should get a lot easier to pedal.
- Do some of the drill from above – note, everything is exactly the same – just easier to pedal!
Things to Remember
- Big lever always goes BIGGER
- Small lever always goes SMALLER
- Right lever is REAR
- Bigger in the rear = EASIER
- Left lever is FRONT
- Bigger in the front = HARDER
- ABSOLUTELY nobody is PERFECT at shifting. I have seen a Tour de France stage lost by a missed shift!
- Practice helps! The more you ride, the better you get!